If you’re running Proxmox and want your VMs to have internet access without exposing them to your home LAN, you’re in the right place. This guide walks you through setting up NAT on Proxmox to create a completely isolated subnet for your virtual machines.
I ran into this exact problem recently. I needed a sandbox network for testing where VMs could reach the internet but couldn’t touch anything on my main network. My router doesn’t support static routes, so the typical bridged setup wasn’t going to cut it. The solution? Let Proxmox handle the routing with NAT.
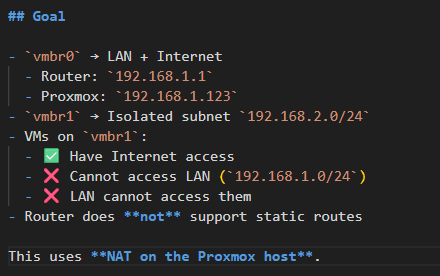
What We’re Building
Here’s the network layout we’re going for:
- vmbr0: Your existing bridge connected to your LAN and internet
Router: 192.168.1.1
- Proxmox host:
192.168.1.123 - vmbr1: A new isolated subnet at
192.168.2.0/24
VMs attached to vmbr1 will:
- Have full internet access
- Be unable to reach your LAN (
192.168.1.0/24) - Be unreachable from your LAN
This is perfect for lab environments, untrusted workloads, or anything you want firewalled off from the rest of your network.
Step 1: Configure the Proxmox Network Interfaces
First, we need to create the isolated bridge. SSH into your Proxmox host and edit the network configuration:
nano /etc/network/interfacesUpdate it to look like this (adjust eno1 to match your actual NIC):
auto lo
iface lo inet loopback

auto eno1
iface eno1 inet manual

auto vmbr0
iface vmbr0 inet static
address 192.168.1.123/24
gateway 192.168.1.1
bridge-ports eno1
bridge-stp off
bridge-fd 0

auto vmbr1
iface vmbr1 inet static
address 192.168.2.1/24
bridge-ports none
bridge-stp off
bridge-fd 0
Notice that vmbr1 has bridge-ports none. That’s intentional, it’s not connected to any physical interface. It’s a purely virtual network that only exists inside Proxmox.
Apply the changes:
systemctl restart networkingStep 2: Configure Your VM’s Network
In the Proxmox web UI, attach your VM’s network interface to vmbr1 instead of vmbr0.
Inside the VM, configure a static IP (or set up DHCP on vmbr1 if you prefer, but that’s outside the scope of this guide):
IP Address: 192.168.2.2
Subnet Mask: 255.255.255.0
Gateway: 192.168.2.1
DNS: 1.1.1.1 (or 8.8.8.8, whatever you like)
At this point, you should be able to ping the gateway:
ping 192.168.2.1If that works, the bridge is set up correctly. Internet won’t work yet though we still need to enable forwarding and NAT.
Step 3: Enable IP Forwarding
By default, Linux won’t forward packets between interfaces. We need to turn that on:
echo net.ipv4.ip_forward=1 > /etc/sysctl.d/99-ipforward.conf
sysctl -p /etc/sysctl.d/99-ipforward.conf
Verify it’s enabled:
cat /proc/sys/net/ipv4/ip_forwardYou should see 1. If you see 0, something went wrong.
Step 4: Set Up nftables
We’ll use nftables for the firewall rules. It’s the modern replacement for iptables and comes standard on recent Debian-based systems.
Install and enable it:
apt install -y nftables
systemctl enable --now nftables
Clear any existing rules to start fresh:
nft flush rulesetStep 5: Configure NAT and Firewall Rules
Now for the important part. These rules do three things:
- NAT traffic from the isolated subnet so it can reach the internet
- Block traffic from the isolated subnet to your LAN
- Allow established connections to flow back
Run these commands:
nft flush ruleset

# Create NAT table and masquerade rule
nft add table ip nat
nft add chain ip nat postrouting '{ type nat hook postrouting priority 100 ; }'
nft add rule ip nat postrouting oifname "vmbr0" ip saddr 192.168.2.0/24 masquerade

# Create filter table for forwarding rules
nft add table ip filter
nft add chain ip filter forward '{ type filter hook forward priority 0 ; policy accept ; }'

# Block isolated subnet from reaching LAN
nft add rule ip filter forward ip saddr 192.168.2.0/24 ip daddr 192.168.1.0/24 drop

# Allow isolated subnet to reach internet via vmbr0
nft add rule ip filter forward iifname "vmbr1" oifname "vmbr0" ip saddr 192.168.2.0/24 accept

# Allow return traffic for established connections
nft add rule ip filter forward ct state established,related accept
The key here is the masquerade rule. It rewrites outgoing packets from the isolated subnet to appear as if they’re coming from the Proxmox host itself. Your router sees traffic from 192.168.1.123, not from 192.168.2.x.
Step 6: Make the Rules Persistent
The rules we just added will disappear after a reboot. Save them so they persist:
nft list ruleset > /etc/nftables.conf
systemctl restart nftables
Testing Everything
From your VM on the isolated network (192.168.2.x), run these tests:
ping 192.168.2.1 # Gateway should work
ping 192.168.1.1 # LAN router should FAIL
ping 1.1.1.1 # Internet should work
ping google.com # DNS resolution should work
From a machine on your LAN (192.168.1.x):
ping 192.168.2.2 # VM on isolated network should FAILIf all those results match, you’re done. Your VMs have internet but are completely isolated from your LAN.
Troubleshooting Tips
VM can’t ping the gateway (192.168.2.1)? Check that vmbr1 exists and has the right IP. Run ip addr show vmbr1 on the Proxmox host.
VM can ping gateway but not the internet? IP forwarding probably isn’t enabled. Double-check /proc/sys/net/ipv4/ip_forward shows 1.
VM can reach LAN when it shouldn’t? The firewall rules aren’t applied correctly. Run nft list ruleset and verify the drop rule for 192.168.1.0/24 is there.
Wrapping Up
This setup gives you the best of both worlds: VMs with full internet access that are completely firewalled from your home network. It’s ideal for homelabs, development environments, or running anything you don’t fully trust.
The nice thing about doing this at the Proxmox level is that you don’t need to touch your router at all. Everything is handled on the hypervisor, which makes it portable and easy to replicate on other Proxmox hosts.
Got questions or run into issues? Drop a comment below.